Skip to content
Skip to content
Workspace

Reveal a layer through another shape

A mask uses another layer's shape to control which part of the selected layer is visible. For example, a circle can reveal a moving image through a round window.
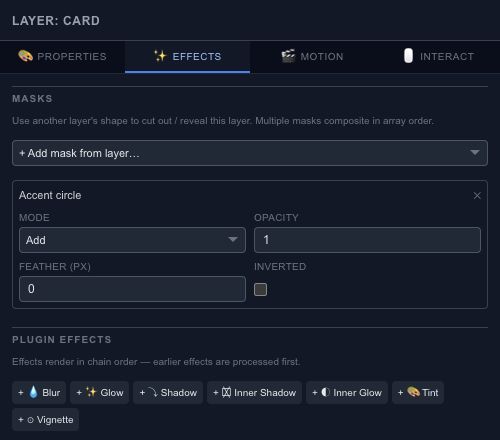
An Accent circle mask with mode, opacity, feather and inversion controls.

Add a mask#

Select the content you want to reveal, open Effects, then choose a source in Add mask from layer. Adjust the source shape on the canvas to change the revealed area. Keep the content layer and the mask source clearly named so they are easy to distinguish later.

Combine and soften#

Add, Subtract and Intersect determine how masks combine. Multiple masks are evaluated in their listed order. Inverted reverses the mask, Opacity reduces its strength, and Feather softens its edge in pixels.

Begin with one unfeathered mask. Once the boundary is correct, soften it slightly and preview against the final background. A large feather can hide the edge you were trying to align.

Check animated masks#

Scrub through the full animation when either the source or the content moves. A good first frame does not guarantee that the mask covers the intended area later. Remove a mask from this panel to detach the relationship without deleting its source layer.

A good place to start
Getting started / Chorono documentationChorono documentationLearn Chorono with editable animation examples. Install the editor, edit keyframes, build loops and connect Claude Code or Codex through MCP. Cre…Getting started / Install ChoronoInstall ChoronoSet up the free, open-source animation editor on your computer and start a local browser session. This guide installs the browser editor, its loc…Getting started / Create your first editable animationCreate your first editable animationOpen an editable Chorono example, change its text and colors, inspect the timeline, then save and reopen your first 2D animation. Start with a re…Workspace / Chorono editor workspaceChorono editor workspaceFind the canvas, layers, properties, timeline and resource tools in the Chorono editor. Choose a guide for each part of your animation workflow.…Workspace / Canvas and drawing toolsCanvas and drawing toolsNavigate the canvas, draw shapes and splines, use snapping and edit motion keys in Chorono. Use the canvas to arrange the objects in your composi…Workspace / Choose a drawing or transform toolChoose a drawing or transform toolUse Select, Pan, Pen, Move, Rotate, Scale and Anchor tools without losing track of the active editing mode. Choose the tool that matches the edit…Workspace / Select exactly the objects you needSelect exactly the objects you needUse box, lasso, circle, paint and rule-based selection to work with several animation layers. When several objects overlap, clicking each one can…Workspace / Align objects with guides and snappingAlign objects with guides and snappingSet grid, object, point, guide, pixel, angle and scale snapping for precise placement in Chorono. Snapping helps a dragged object settle on an ex…Workspace / Edit Bézier points and spline curvesEdit Bézier points and spline curvesDraw editable paths, adjust points and handles, and extend or close a spline in Chorono. A curve is easier to control when you can see the points…Workspace / Edit animation positions on the canvasEdit animation positions on the canvasUse Motion Keys to adjust position keys, draw a movement and control how the path is timed. Motion Keys bring position editing onto the canvas. T…Workspace / Layers and scene hierarchyLayers and scene hierarchySelect, name, group and organize scene objects in Chorono using the Layers panel and Scene Explorer. A layer is an editable object in your Choron…Workspace / Draw and edit basic shapesDraw and edit basic shapesCreate rectangles, circles, polygons and procedural shapes, then adjust their geometry in Properties. Basic shapes are a useful starting point fo…
Explore the docs